Beyond Pore Volume: A New Model to Predict Fatigue Life in Cast Aluminum
This technical summary is based on the academic paper "Detection and influence of shrinkage pores and non-metallic inclusions on fatigue life of cast aluminum alloys" by Yakub Tijani, Andre Heinrietz, Wolfram Stets, and Patrick Voigt, published in Metallurgical and Materials Transactions (2013).

Keywords
- Primary Keyword: Fatigue Life of Cast Aluminum
- Secondary Keywords: Shrinkage Pores, Non-metallic Inclusions, Defect Analysis, Aluminum Alloys, Fatigue Strength
Executive Summary
- The Challenge: The fatigue life of cast aluminum is reduced by defects like shrinkage pores, but simply measuring pore volume is not enough to accurately predict this reduction.
- The Method: Researchers produced cast aluminum test bars with controlled defects, quantified them using X-Ray CT and a custom image analysis algorithm, and then conducted fatigue testing.
- The Key Breakthrough: A new parametric model was developed that accurately calculates fatigue life by considering not just pore volume, but also pore size, shape, and proximity to the component's surface.
- The Bottom Line: Accurately predicting the fatigue life of cast aluminum components requires a comprehensive defect analysis that goes beyond simple volume measurement, incorporating defect location and geometry.
The Challenge: Why This Research Matters for HPDC Professionals
In demanding industries like automotive, aluminum castings are subjected to high mechanical cyclic loading. However, the production process inevitably generates defects such as shrinkage pores and non-metallic inclusions (oxide skins). These microstructural discontinuities are known to adversely influence the structural durability and fatigue life of components.
While avoiding these defects completely is often cost-prohibitive, the real challenge lies in quantifying their impact. Existing methods for analyzing fatigue life often fall short, and standard tools for material testing struggle with the quantitative analysis and simultaneous distinction of different defect types within a casting. This research was undertaken to address this gap, aiming to move beyond simple defect detection to a more predictive understanding of their influence on performance.
The Approach: Unpacking the Methodology
To investigate the influence of defects, the research team needed a reproducible method for creating test samples with defined defect content.
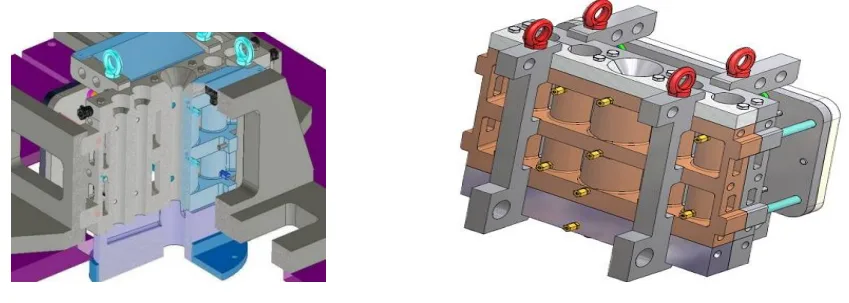
- Controlled Sample Production: A permanent mold was designed with integrated heating and cooling devices to precisely control solidification conditions. This allowed for the generation of test bars with varying levels of shrinkage pores. The study focused on two common alloys: EN AC-AlSi8Cu3 and EN AC-AlSi7Mg0.3.
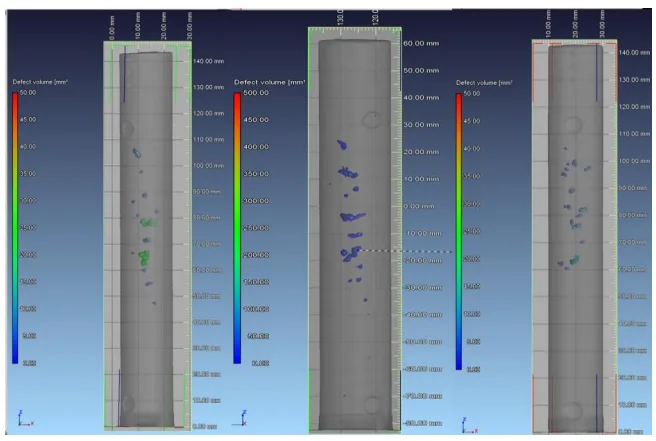
- Defect Characterization: A total of 1,092 cast bars were investigated using X-Ray computer tomography (CT) to detect and quantify internal pores. The samples were then classified into three groups based on the volume of the largest pore (PV < 0.5mm³, 0.5 – 2 mm³, and 2 – 4 mm³). For finer analysis of non-metallic inclusions, which are too thin for CT detection, a special image analysis algorithm was developed to automatically distinguish between gas pores, shrinkage pores, and oxides from metallographic images.
- Mechanical Testing: Selected specimens underwent fatigue testing on a 25 kN servo-hydraulic machine. The tests were conducted under fully reversed (R = -1), constant-amplitude axial loading at a frequency of 80 Hz to determine the number of cycles to failure.
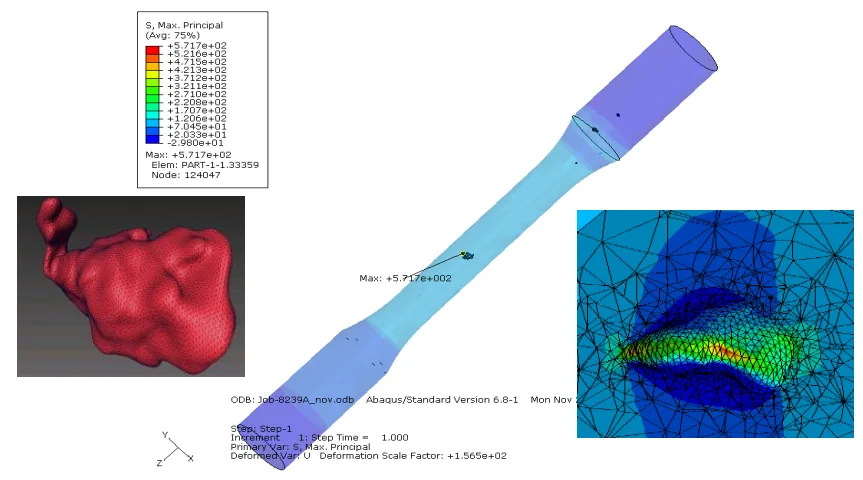
- Modeling: The data from CT scans was used to create detailed 3D models of the pores for Finite Element Method (FEM) simulation. This allowed for the calculation of local stresses around the defects and the development of a new parametric model for predicting fatigue life.
The Breakthrough: Key Findings & Data
The study produced several critical findings that challenge conventional approaches to quality assessment in aluminum castings.
Finding 1: Pore Volume Alone is an Insufficient Predictor of Fatigue Life
While the presence of pores clearly lowered fatigue strength, classifying components based on maximum pore volume was not a reliable predictor of performance. The S-N curves for the AlSi7Mg0.3 alloy, shown in Figure 7(b), demonstrate this clearly. The data for the three different pore volume classes (PV < 0.5 mm³, 0.5-2 mm³, and 2-4 mm³) significantly overlap, showing no distinct difference in fatigue life between the groups. This indicates that other factors beyond simple volume—such as pore shape and location—play a dominant role.
Finding 2: A New Parametric Model Accurately Predicts Fatigue Life
The research culminated in a parameterized model that calculates a pore's notch shape factor (Kt) based on its size, shape, and distance to the specimen surface. This model provides a much more accurate way to assess a defect's impact. The model's accuracy was validated with FEM analysis, which showed that local stresses are highest at pores located closest to the component surface (Figure 8). When the fatigue life predicted by this new model was compared to the actual experimental results, the correlation was nearly perfect, with an R² value of 0.9998, as shown in Figure 9. This confirms that a comprehensive evaluation of pore geometry and location is essential for reliable life prediction.
Practical Implications for R&D and Operations
- For Process Engineers: This study suggests that focusing on solidification control to minimize near-surface porosity is critical. The finding that a pore's proximity to the surface dramatically increases local stress means that process adjustments aimed at improving feeding in the final stages of solidification can yield significant improvements in fatigue performance.
- For Quality Control Teams: The data in Figure 7 illustrates that classifying parts based solely on maximum pore volume via CT scanning may be insufficient for critical applications. Adopting analysis that incorporates the parameters from the paper's model (pore size, shape, and distance to surface) could lead to more reliable, non-destructive quality inspection criteria.
- For Design Engineers: The findings indicate that the location of defects is as important as their size. This suggests that during the early design phase, simulations of mold filling and solidification should be used to predict areas susceptible to porosity. High-stress regions of a component should be designed to ensure robust feeding, minimizing the chance of critical defects forming where they can do the most damage.
Paper Details
Detection and influence of shrinkage pores and non-metallic inclusions on fatigue life of cast aluminum alloys
1. Overview:
- Title: Detection and influence of shrinkage pores and non-metallic inclusions on fatigue life of cast aluminum alloys
- Author: Yakub Tijani, Andre Heinrietz, Wolfram Stets, Patrick Voigt
- Year of publication: 2013
- Journal/academic society of publication: Metallurgical and Materials Transactions
- Keywords: Aluminum, Shrinkage Pores, Fatigue Strength
2. Abstract:
In this work, test bars of cast aluminum alloys EN AC-AlSi8Cu3 and EN AC-AlSi7Mg0.3 were produced with a defined amount of shrinkage pores and oxides. For this purpose a permanent mold with heating and cooling devices for the generation of pores was constructed. The oxides were produced by a contamination of the melt. The specimens and their corresponding defect distributions were examined and quantified by X-Ray computer tomography (CT) and quantitative metallography respectively. A special test algorithm for the simultaneous image analysis of pores and oxides was developed. The defective samples were examined by fatigue testing. The presence of shrinkage pores causes a lowering of the fatigue strength. The results show that pore volume is not sufficient to characterize the influence of shrinkage pores on fatigue life. A parametric model for the calculation of fatigue life based on the pore parameters obtained from CT scans was implemented. The model accounts for the combined impact of pore location, size and shape on fatigue life reduction.
3. Introduction:
The most of aluminum castings are used in automotive applications that require high mechanical cyclic loading. However, during the production and processing of aluminum alloy melt, several kinds of defects in various forms are generated. The defects lead to microstructural discontinuities and adversely influence the structural durability of the produced castings. Typical example of cast defects are shrinkage pores which are often correlated with the release of solved gas in the solidifying melt. Another type is non-metallic inclusions (in most cases oxide skins) which are generated due to the charging material in the furnace or during mold filling. These defects cannot be completely avoided during production without incurring additional costs. Furthermore the consideration of quantitative defect parameters in the numerical analysis of fatigue life is not state of the art. Another problem is the quantitative analysis of the content and distribution of the inner defects in Al castings. The metallographic investigation by image analysis is a standard tool for materials testing but the simultaneous distinction of several defects at the same time is not possible with most commercial software packages.
4. Summary of the study:
Background of the research topic:
Aluminum castings are widely used in applications requiring high structural durability, but their performance is often limited by process-induced defects like shrinkage pores and non-metallic inclusions.
Status of previous research:
While the negative impact of defects on fatigue life is known, quantitative analysis of these defects and their specific parameters (beyond simple volume) in numerical fatigue life analysis is not state-of-the-art. Furthermore, standard software struggles to differentiate between various defect types automatically.
Purpose of the study:
To investigate the influence of shrinkage pores and non-metallic inclusions on the fatigue life of cast aluminum alloys, and to develop a model that can accurately predict fatigue life based on quantifiable defect parameters.
Core study:
The study involved producing aluminum alloy samples with controlled defects, characterizing these defects using CT and a custom metallographic image analysis algorithm, conducting fatigue tests, and developing a parametric model to calculate fatigue life based on pore size, shape, and location.
5. Research Methodology
Research Design:
An experimental approach was used to produce samples with varying defect levels, followed by non-destructive and destructive testing to correlate defect characteristics with fatigue performance. This data was then used to create and validate a predictive mathematical model.
Data Collection and Analysis Methods:
Data was collected using X-Ray computer tomography (CT) for pore volume and location, quantitative metallography with a custom algorithm for defect type classification, and servo-hydraulic fatigue testing for life cycle data. Finite Element Method (FEM) analysis was used to model stress concentrations around pores.
Research Topics and Scope:
The research focused on two cast aluminum alloys, EN AC-AlSi8Cu3 and EN AC-AlSi7Mg0.3. The primary defects studied were shrinkage pores and oxides. The study scope included defect generation, advanced defect characterization, fatigue testing, and the development of a predictive fatigue life model.
6. Key Results:
Key Results:
- The presence of shrinkage pores causes a lowering of the fatigue strength in cast aluminum alloys.
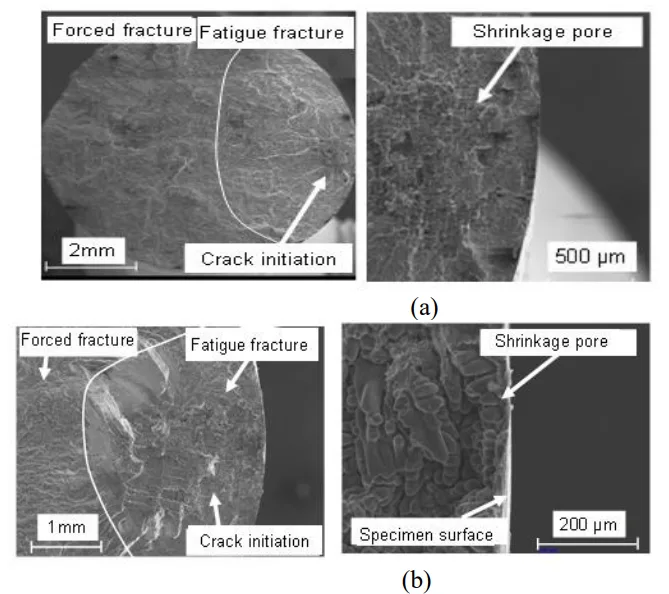
- Fractography showed that in 95% of cases, a shrinkage pore was the crack-initiating defect.
- The results demonstrate that pore volume alone is not sufficient to characterize the influence of shrinkage pores on fatigue life, as shown by overlapping S-N curves for different pore volume classes in the AlSi7Mg0.3 alloy.
- A parametric model was developed that accounts for the combined impact of pore location, size, and shape, showing a near-perfect correlation (R² = 0.9998) with experimental fatigue life results.
Figure Name List:
- Figure 1. Designed permanent mold with downsprue and runner for (a) low pressure die casting and (b) gravity casting
- Figure 2: Reconstructed X-ray computer tomography (CT) for classification of shrinkage pores
- Figure 3. Specimen geometry for fatigue experiments
- Figure 4. Gas pores, shrinkage pores and oxide inclusions (skins) in Al cast samples (from left to right)
- Figure 5. Scanning Electron Microscope images of (a) AlSi8Cu3 and (b) AlSi7Mg0.3 specimens showing the fracture surface, location of crack initiation and the shrinkage pore that initiated the crack.
- Figure 6. S-N curves of specimens with pores (black) and reference material (red) for AlSi8Cu3 (a) and AlSi7Mg0.3 (b).
- Figure 7. S-N Curves of the specimens with different maximum pore volumes (PV) for AlSi8Cu3 (a) and AlSi7Mg0.3 (b).
- Figure 8. Finite element model of a specimen from AlSi7Mg0.3-T6 showing the pore with highest value of maximum principal stress
- Figure 9. Correlation between results of fatigue life from experimental investigations and the parameterized evaluation model


7. Conclusion:
The study provides a greater understanding of how microstructural inhomogeneities influence the fatigue life of cast aluminum alloys. Fatigue experiments confirm that defects reduce fatigue strength, but crucially, they indicate that pore volume alone is not sufficient to quantify this influence. The implemented parameter model, which requires pore size, shape, and distance to the specimen surface, provides reliable predictions of fatigue life. This model is valuable for industrial castings where pores are a major driving force for the reduction of structural durability.
8. References:
- [1] J.Z. Yi, Y.X. Gao, P.D. Lee, H.M. Flower, and T.C. Lindley, The effects of microstructure and defects on fatigue properties in cast A356 aluminium -silicon alloy, Fatigue and Fracture of Engineering Materials and Structures 27 (2004), S. 559 – 570
- [2] M.J. Couper, A.E. Neeson, and J.R. Griffiths, Casting Defects and the Fatigue Behaviour of an aluminium Casting Alloy, Fatigue Fract. Engng. Mater. Struct. Vol.13 (3), 1990, p 213-227
- [3] C.M. Sonsino and J. Ziese, Fatigue Strength and Applications of Cast Aluminium Alloys with different Degrees of Porosity, Int. J. Fatigue, Vol 15 (No. 2), 1993, p 75-84
- [4] J. Linder, M. Axelsson, and H. Nilsson, The influence of porosity on the fatigue life for sand and permanent mould cast aluminium, International Journal of Fatigue 28 (2006), S. 1752-1758
- [5] Q.G. Wang, C.J. Davidson, J.R. Griffiths, and P.N. Crepeau, Oxide Films, Pores and the Fatigue Lives of Cast Aluminum Alloys, Met. & Mat. Trans. B, Vol 37B, Dec 2006, 887-895
- [6] A. Velichko, Quantitative 3D Characterization of Graphite Morphologies in Cast Iron using FIB Microstructure Tomography, PhD Thesis, Univ. of Saarland, Germany, 2008, p 114-115
- [7] Q.G. Wang, D. Apelian, and D.A. Lados, Fatigue Behaviour of A356-T6 Aluminium Cast Alloys. Part 1. Effect of Casting Defects, Journal of Light Metals, Vol 1, 2001, p 73-84
- [8] Y. Tijani, A. Heinrietz, T. Bruder, and H. Hanselka, Quantitative Evaluation of Fatigue Life of Cast Aluminium Alloys by Non-Destructive Testing and Parameter Model, Conf. Proc., Mat. Sci. & Techn. 2011, Columbus OH, 2011
- [9] Abaqus/CAE, Finite Element Modeling, Visualization and Process automation, Dassault Systèmes (SIMULIA), USA.
Expert Q&A: Your Top Questions Answered
Q1: Why were two different aluminum alloys, EN AC-AlSi8Cu3 and EN AC-AlSi7Mg0.3, chosen for this study?
A1: The paper does not explicitly state the reason for choosing these two specific alloys. However, it does highlight a key difference in their mechanical properties in the Fractography section. It notes that the AlSi7Mg0.3 alloy has a significantly higher ductility (A = 8.7 %) compared to the AlSi8Cu3 alloy (0.9 %). This difference was used to explain why more crack initiators were found inside the specimen for AlSi7Mg0.3 (31%) versus AlSi8Cu3 (4%), suggesting the study aimed to see how defect influence varied in alloys with different ductility.
Q2: The paper states that producing specimens with oxide inclusions was "not reproducible." Why is this significant for interpreting the results?
A2: This is significant because it means the study's primary, controllable defect was shrinkage porosity. The paper notes that "the amount and the distribution of the oxide skins or compact inclusions were non-uniformly distributed." This lack of control, combined with the fractography result that 95% of fatigue failures initiated from shrinkage pores, strongly suggests that shrinkage porosity was the dominant life-limiting defect in this experimental setup.
Q3: Figure 7(b) shows that for AlSi7Mg0.3, the S-N curves for different pore volumes overlap. What is the physical explanation for this?
A3: The physical explanation is that pore volume is not the only, or even the most important, factor governing fatigue life. The paper's conclusion states that a "comprehensive evaluation will require the pore size, shape and distance to specimen surface." A small but sharp pore located just under the surface (a high-stress area) can be far more detrimental than a larger, more rounded pore located deep within the component's core. Since the classification in Figure 7 is based only on volume, it mixes pores of varying shapes and locations, causing the fatigue life data to overlap.
Q4: The parametric model in Equation (1) includes a term for "pore distance to surface." How was the importance of this factor validated in the study?
A4: The importance of this factor was validated through Finite Element Method (FEM) analysis, as shown in Figure 8. The researchers created a 3D model of a specimen from micro-CT data and simulated the stress distribution under a nominal load. The results "observed that the highest stresses occur at the pores in the regions between the pores and the specimen surface," directly confirming that proximity to the surface significantly increases local stress concentration and is therefore a critical variable for predicting fatigue failure.
Q5: What was the purpose of developing a special image analysis algorithm when commercial software exists?
A5: The Introduction section explicitly states that "the simultaneous distinction of several defects at the same time is not possible with most commercial software packages." The researchers needed to automatically and accurately separate shrinkage pores, gas pores, and oxides from metallographic images to quantify them. Developing a custom classifier, which achieved a 90% hit rate, was necessary to overcome the limitations of existing tools and enable the detailed defect analysis required for the study.
Conclusion: Paving the Way for Higher Quality and Productivity
This research fundamentally shifts the conversation around defect analysis from simple detection to predictive assessment. By proving that pore volume alone is an insufficient metric, the study highlights the critical need for a more sophisticated approach. The development of a parametric model that incorporates pore size, shape, and location provides a powerful new tool for accurately predicting the Fatigue Life of Cast Aluminum components. This allows for more intelligent quality control, optimized process parameters, and ultimately, more durable and reliable products.
At CASTMAN, we are committed to applying the latest industry research to help our customers achieve higher productivity and quality. If the challenges discussed in this paper align with your operational goals, contact our engineering team to explore how these principles can be implemented in your components.
Copyright Information
- This content is a summary and analysis based on the paper "Detection and influence of shrinkage pores and non-metallic inclusions on fatigue life of cast aluminum alloys" by "Yakub Tijani, Andre Heinrietz, Wolfram Stets, and Patrick Voigt".
- Source: Metallurgical and Materials Transactions Volume 44A, Number 6, June 2013. A direct link can be found through academic search engines using the title and authors.
This material is for informational purposes only. Unauthorized commercial use is prohibited.
Copyright © 2025 CASTMAN. All rights reserved.